Building Qt 5 on the Toradex T30

In this blog posting, we will describe the steps needed to build Qt 5 on the Toradex T30 hardware platform.
The Toradex Colibri T30
The Toradex Colibri T30 is an ARM development platform distributed by Toradex, a company in Switzerland that provides a number of ARM and Intel based development products. Their web site is here.
Hardware
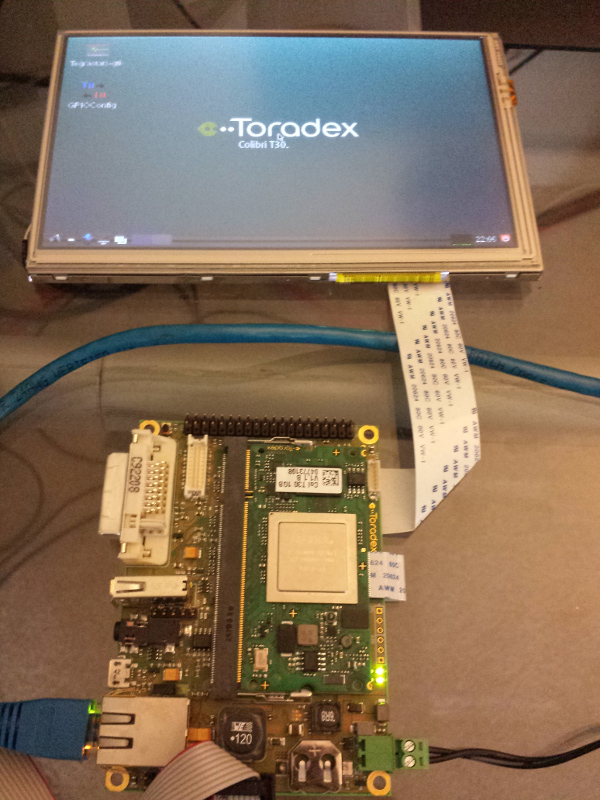
The kit used in this document is comprised of the Iris carrier board, the T30 processor module and a 7-inch LCD with resistive touch. The T30 module contains an NVIDIA® Tegra® 3 ARM processor with a quad core processor and 1 GB of main memory.
Other processor modules, such as the T20 (a NVIDIA Tegra 2 processor), can also be used with the Colibri carrier board. A picture of the kit in operation is shown below. More information on this configuration can be found here.

The Colibri carrier board includes USB, DVI, and Ethernet ports, 3.5 mm audio jack, microSD card slot and a 10 pin RS-232 serial connector. The serial connector is used to access the Linux console. It requires a DTK/Intel IDC10 header connector to DB9 serial adapter cable. which is not included.
The USB port can be used to connect USB peripherals as well as to flash the on-board NAND when the target is in recovery mode.
The touchscreen is supported by X11 and will therefore work fine with Qt applications.
Software
This device uses the OpenEmbedded Core (OE) build framework for building its Ångström Linux-based development kit.
OpenEmbedded provides a mechanism by which an entire Linux distribution (including the compiler tool chain) can be constructed and maintained. Toradex developers provide all of the information necessary to check out their Git repositories, set up a build environment and build the complete distribution from scratch.
When building Qt it is important to create a complete sysroot for the device. This can be done through their OpenEmbedded "recipes". First, we need to install some required packages on the host you will be using to do the build. The following example assumes that the host is an Ubuntu 12.04LTS system. Run the following command to install the packages (the command should all be on one line):
sudo apt-get install gawk wget git diffstat unzip texinfo build-essential chrpath libsdl1.2-dev xterm gcc-multilib uuid-dev liblzo2-dev libz-dev curl libreadline libreadline-dev ruby flex bison gperf
On this page, there are detailed instructions on how to check out the OE environment and recipes and then do a full build. Toradex has recently switched to using the repo tool for checking out all of the correct recipes at the correct versions for building. For this article, I followed the directions under the section "V2.1 Images". This method is far simpler than previous methods for building a complete OE installation and I highly recommend it. At the time of this writing, the steps were the following:
mkdir ~/bin
export PATH=~/bin:$PATH
curl http://commondatastorage.googleapis.com/git-repo-downloads/repo > ~/bin/repo
chmod a+x ~/bin/repo
mkdir oe-core
cd oe-core
repo init -u http://git.toradex.com/toradex-bsp-platform.git -b LinuxImageV2.1
repo sync
. export
At this point you are almost ready to start the build. Please check the website first, in case these instructions have changed.
You will want to modify the oe-core/build/conf/local.conf file to specify certain things about your desired build. Specifically you should change BB_NUMBER_THREADS to be equal to the number of available cores. In addition, set PARALLEL_MAKE to "-j <n>", where <n> is equal to the number of cores you have available. In spite of their similar values both variables are responsible for different things. BB_NUMBER_THREADS tells bitbake how many outstanding "tasks" to run at once, while PARALLEL_MAKE, tells make how many concurrent build operations to perform at the same time.
The primary OE command used to build components is bitbake.
You also need to ensure that MACHINE is set to "colibri-t30" so OE knows what the target build will be. Depending on your environment there there are other variables in this file you may want to modify. For my build, my system settings were:
BB_NUMBER_THREADS = "4"
PARALLEL_MAKE = "-j 4"
MACHINE ?= "colibri-t30"
To build a similar environment from scratch you will need approximately 60 GB of available disk space and as many fast cores as you can provide. With a quad core x86_64 Ubuntu Server 12.04 as the host, the build took about 4 to 5 hours and was completed without incident. I built the angstrom-lxde-image image as follows:
bitbake angstrom-lxde-image
The result is a cross compiler toolchain you can find in /oe-core/build/out-eglibc/sysroots/i686-linux/usr/bin/armv7ahf-vfp-neon-angstrom-linux-gnueabi/. In the example above the host was a 32-bit machine, hence the i686-linux in the path. If you are using a 64-bit machine that component will be x86_64-linux instead.
The sysroot for the T30 itself containing the ARM libraries and header files needed to cross compile code for the target can be found in ~/oe-core/build/out-eglibc/sysroots/colibri-t30/.
In addition, a few hundred ipkg format packages (.ipk) are constructed based on the build. These packages can be installed on the target using the opkg command if desired. These packages should be located in ~/oe-core/build/out-eglibc/deploy/ipk/*. There are several packages you should install once building is complete. These are required for Qt (specifically QtWebKit and QtMultimedia). Copy the following packages onto your target and install them with opkg as follows:
opkg install icu_50.1.2-r0_armv7ahf-vfp-neon.ipk \
libicui18n50_50.1.2-r0_armv7ahf-vfp-neon.ipk \
libicutu50_50.1.2-r0_armv7ahf-vfp-neon.ipk \
libpulse0_3.0-r0_armv7ahf-vfp-neon.ipk \
libpulsecommon_3.0-r0_armv7ahf-vfp-neon.ipk \
libpulsecore_3.0-r0_armv7ahf-vfp-neon.ipk \
libjson0_0.9-r0_armv7ahf-vfp-neon.ipk \
speex_1.2rc1-r2_armv7ahf-vfp-neon.ipk \
libgstapp-0.10-0_0.10.36-r12_armv7ahf-vfp-neon.ipk
While all packages are installed within the sysroot, only a small subset of them will actually be installed on the target itself, so it is possible you will need to track down other packages that you will need to install on the target, depending on what you are building. The packages above should be sufficient for running the Qt examples.
Building Qt 5.2.0
For building Qt 5.2, the first step is to download and unpack the Qt 5.2.0 Open Source edition source code:
cd
wget http://download.qt-project.org/official_releases/qt/5.2/5.2.0/single/qt-everywhere-opensource-src-5.2.0.tar.gz
tar xvf qt-everywhere-opensource-src-5.2.0.tar.gz
cd qt-everywhere-opensource-src-5.2.0
Once you have unpacked the tar archive, you will need to construct a device-spec for the target. I simply copied the existing mkspecs/devices/linux-tegra2-g++/ directory into a new mkspecs/devices/linux-tegra3-g++/ directory and made some edits to the qmake.conf file suitable for this hardware.
Here is the qmake.conf file:
#
# qmake configuration for the Tegra3 boards.
#
# This device-spec is based and tested on the Toradex Colibri-T30 using "Ubuntu Server 12.04"
# It might work with other boards and releases as well.
include(../common/linux_device_pre.conf)
QMAKE_INCDIR   += $$[QT_SYSROOT]/usr/include
QMAKE_LIBDIR   += $$[QT_SYSROOT]/usr/lib \
$$[QT_SYSROOT]/lib/arm-angstrom-linux-gnueabi \
$$[QT_SYSROOT]/usr/lib/arm-angstrom-linux-gnueabi
QMAKE_LFLAGS   += -Wl,-rpath-link,$$[QT_SYSROOT]/usr/lib \
-Wl,-rpath-link,$$[QT_SYSROOT]/usr/lib/arm-angstrom-linux-gnueabi \
-Wl,-rpath-link,$$[QT_SYSROOT]/lib/arm-angstrom-linux-gnueabi
DISTRO_OPTS += "hard-float"
TEGRA3_CFLAGS   = -mtune=cortex-a9 -march=armv7-a
QMAKE_CFLAGS   += $$TEGRA3_CFLAGS
QMAKE_CXXFLAGS += $$TEGRA3_CFLAGS
include(../common/linux_device_post.conf)
load(qt_config)
And here is the qplatformdefs.h file:
#include "../../linux-g++/qplatformdefs.h"
These files can be downloaded from here.
The main changes required were:
- Change the location of the libraries and include directories.
- Change the default CFLAGS and CXXFLAGS to remove the various floating-point specifications present in the Tegra2 device-spec which are not needed for this device.
- Add DISTRO_OPTS option to indicate that hard-float calling conventions apply. Without this option, there will be failures in compilation, especially with qtjsbackend. In addition, the Tegra3 does support NEON instructions, so remove the suggestion of building Qt with -no-neon.
On many embedded systems, you would normally build Qt 5 using EGL and OpenGL/ES using the eglfs QPA backend. On this particular device, while EGL is provided, it is intended for use with an X11 server only. The Colibri-T30 includes an X11 server with accelerated drivers from NVidia. In addition, while a desktop OpenGL implementation is provided, it is not accelerated. An accelerated OpenGL ES implementation is present however.
As a result, when configuring Qt for the initial build you will want to use the xcb QPA backend and specify es2 as the OpenGL renderer. Below is the configure command line I used to build Qt 5.2.0:
./configure -qpa xcb -no-eglfs -opengl es2 -device tegra3 -device-option CROSS_COMPILE=~/oe-core/build/out-eglibc/sysroots/i686-linux/usr/bin/armv7ahf-vfp-neon-angstrom-linux-gnueabi/arm-angstrom-linux-gnueabi- -sysroot ~/oe-core/build/out-eglibc/sysroots/colibri-t30 -opensource -confirm-license -optimized-qmake -reduce-relocations -reduce-exports -release -nomake tests -prefix /opt/qt5-t30 -make examples -no-pch -qt-xcb -skip qttools -no-kms
You will note the -qpa xcb and the -opengl es2 options. The -device option accepts the device name - the middle word in the linux-tegra3-g++ tuple that contains our modified qmake.conf file.
In addition, the location of the sysroot is specified by the -sysroot option. When Qt has been compiled and installed host specific utilities (like qmake) will be installed in /opt/qt5-t30 on the host, while target specific libraries and header files will be installed in $SYSROOT/opt/qt5-t30 where $SYSROOT is the sysroot location specified to the -sysroot option for configure command. The -device-option option is only used to supply the prefix for the cross compiler needed to build. Note the trailing '-'. This is important as this specifies the prefix to prepend to the actual compile commands (such as gcc, g++, ld, etc). Forgetting this dash is a common source of grief. On this system the name of the C++ cross compiler is arm-angstrom-linux-gnueabi-g++, for example.
Now, with some luck, the configuration has completed without error and you will then want to just run make, followed by make install. If you have a multi-core system, use the '-j 'option to specify how many cores to use for building Qt. This will speed things up considerably. For example:
make -j 4
make -j 4 install
Once installation is complete you can test it on the target by copying your built /opt/qt5-t30 directory structure to the target. In my case I was using a TFTP/NFS configuration for booting the target as described here. This meant that all I needed to do was copy the /opt/qt5-t30 directory structure onto the exported root filesystem and it was available immediately to the target for testing.
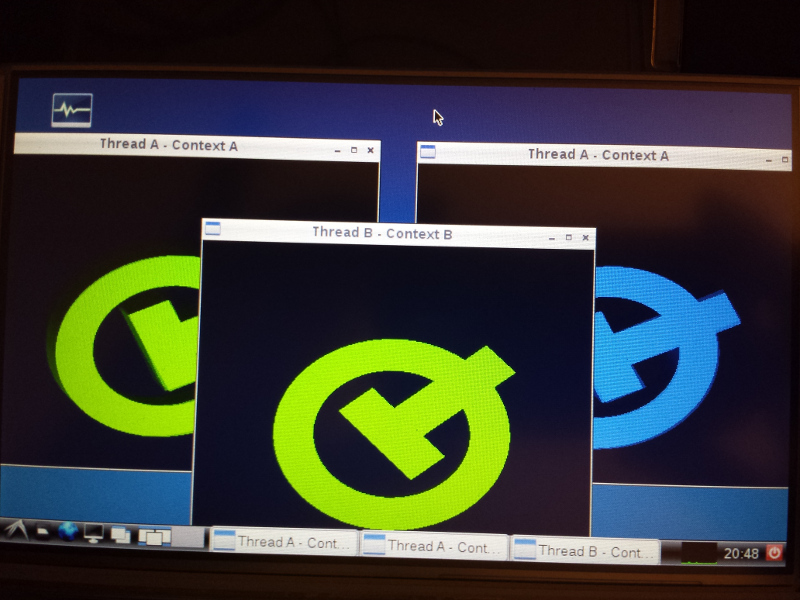
The following is a picture of the hellowindow OpenGL demo running:

Building Your Own Qt Applications
If you wish to build your own Qt applications, all the pieces needed to do so are now present. Simply ensure that /opt/qt5-t30/bin is first in your path on your build host so that you get the correct qmake, then do the usual:
qmake
make
Depending on your application, you may need to track down further .ipk packages and install them on the target in order for your applications to run properly.
Summary
While I have glossed over some of the more mundane details, I hope this document has provided some useful information on getting Qt 5 up and running on the Toradex Colibri T30.